[Index]


[That Way, Western Front, 1941]


I have always liked the look of the Soviet pre-war fast tanks, and when I saw the Eastern Express BT-7 kit at a show I picked it up.   Upon opening the box I knew I was in for a challenge.   Dimensionally the kit is accurate, but detail wise it is very soft.   I started to gather up as much reference as I could, and I quickly found most of these tanks never made it past 1942, and a majority where quickly destroyed when Barbarosa began.   I knew I wanted to put this BT-7 
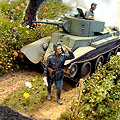
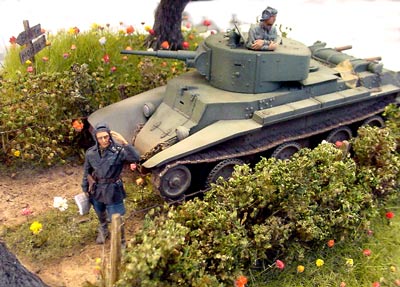
in a diorama and I quickly formulated a scene.   I planned on having the little tank coming up a dirt country lane in the late spring, with bushes on either side of the road, and with flowers blooming in the grass around to add a little color.   The tank commander would be out with a map asking a soldier for directions, getting back on course.   With my little scene in mind, I proceeded to start the build.


Eastern Express BT-7 Mod. 1937 Early
With reference in hand I started looking for aftermarket goodies to detail this little tank up.   I bought the Eduard photo-etch, Jordi-Rubio barrel, and Friulmodel tracks.   Even with the P.E. I knew I was going to have to scratch build a lot of detail.


[Photo by Greg Hanchuck] [Photo by Greg Hanchuck]


The Hull:   I started with the hull, carefully aligning the sides.   Before I glued the top on I cut out and boxed in the engine intake areas.   Despite careful alignment, some filler was still needed.   It was during the sanding that some of the hull rivets were damaged.   Instead of just replacing the ones I sanded off, I decided to replace all of them.   I carefully removed and sanded all the rivets off and marked their locations.   Next I broke out my Historex punch and die sets and started to go to town.   I only did 1 side at a sitting, because after a while punching out all those rivets becomes mind-numbing.


[Note cast texture on nose piece and rivets - Photo by Greg Hanchuck]


With all the rivets replaced I started detailing the front hull.   From my references the nose piece appears cast, so I created a cast texture with liquid cement stippled with an old brush.   I also added weld beads at the joints with stretched sprue softened liquid cement and textured with a sharp blade.   Next I added the various rivets and bolt heads that were lacking, and scratch built the driver hatch hold open spring/latch.   The headlights received new brackets made of brass with wiring, while the front steering arms and rods were also reworked so everything fit.


[the engine deck...]


On the engine deck, I replaced the 2 big side intakes with the Eduard etched ones.   They came in 5 pieces and I knew just super gluing them would be too fragile, so I tried my hand at soldering.   After practicing on some scrap brass, I soldered them up.   The round circular hatch on top of the main engine hatch was scratch built and detailed.   The kit's screen is molded solid, so I had to carefully cut out the grill.   This wasn't very easy, as I gouged the support beams a few times and cracked them apart.   Before I tackled the main engine screen, I scratched the engine louvers from plasticard.   I then finished it off with Aber's fine etched mesh for the grill.


[Photo by Greg Hanchuck]
[Nice Pipes...]
[Cool Tools...]
[Rear Stowage Boxs, and those rivets... Photo by Greg Hanchuck]

The kit exhausts were totally unusable.   They were way too thick.   I rolled thin brass into a tube and soldered it and added more tubing going down to the engine.   Those were left off until after painting.  


I replaced the kit shovels with p.e. blades and plastic rod handles.  


The rear stowage box lids were replaced with plastic sheet and detailed with p.e. hinges, clasps and locks.   P.E. fenders were also added along with detailed fuel storage boxes.  


I originally planned on using the kit tracks, but after cleaning a few runs up, they didn't look right.   I sprang for the Friul tracks and they give it the perfect sag of the real tank.


[Jordi barrel - Photo by Greg Hanchuck] [coaxial machine gun was scratch built - Photo by Greg Hanchuck]

THE TURRET:   Knowing I was to have one of the hatches open, I added a rudimentary interior consisting of the Eduard gunbreach to fill the void.   P.E. bits were added along with missing bolt heads/rivets and the lifting rings were replaced with solder.   The gun mantlet received weld beads and the main gun cradle was modified to accept the Jordi barrel.   The coaxial machine gun was scratch built using steel tubing, plastic and lead foil.   With construction complete it was on to the paint.
[Finished Turret]


[Index]