[The scene was to be the crew of M-12 taking a break and would be called Respite.]


I've had the idea for this diorama (my first) for some time.   Then I picked up the Academy M-12 kit at the Dallas Nationals in 2000.   The scene was to be the crew of M-12 taking a break and would be called 'Respite'.


[Tracks!] [I added detail to the kit bogie assembly by adding rivets]


The Kit:  This would be my first build of a Sherman based assembly.   I relied heavily on Pete Harlem's 'Modelers Guide to the Sherman' from Ampersand Publishing.   I added detail to the kit bogie assembly by adding rivets to the solid spoke road wheels, bolt heads and safety wire to the main bogie frame, and bolt heads to the skids on top of the bogie assembly.


[Eduard photoetch tool tie downs.] [Eduard photoetch engine compartment screens]


I included the Eduard photoetch set, which included engine compartment screens, tool tie downs and much more.


[The driver's compartment was to be left open] [Some details were added that included a scratch built drive shaft, driver's helmets, weapons etc.]


The driver's compartment was to be left open, so some details were added that included a scratch built drive shaft, driver's helmets, weapons etc.


[I did use an after market barrel, which was no easy find.]


I did use an after market 155mm barrel from CMK- Hot Barrels, (which was no easy find).   Overall, the kit assembly went very well.   It had nice out of the box detail that I added to.   I would rate the kit excellent.


[I used Model Master enamels for the main colors.]


Painting:  Painting was accomplished by first giving the entire model a coat of Poly Scale grimy black.   The grimy black created natural shadows in recesses, corners etc., when the main colors were applied.   I used Model Master enamels for the main colors.   These included Field Drab, Olive Drab, Faded Olive Drab, SAC Bomber Tan and Armor Sand.   They were applied in that order to bring depth and highlights to the model's surface.   The markings came from Archer Dry Transfers.


[For weathering, I used a watercolor product called Gouache.] [Washes of Lamp Black, Raw Umber and Burnt Sienna were brushed onto the desired areas]


Weathering:  For weathering, I used a watercolor product called Gouache.   First, the entire model was given a coat of Future.   Then the washes of Lamp Black, Raw Umber and Burnt Sienna were brushed onto the desired areas and left to dry overnight.   The next day, any excess was removed with a damp brush.   This can be repeated as many times necessary to get the desired results as the watercolor is easily removed from the future.   Finally, a dry brushing of artist oil Bleached Titanium was added to bring out the final detail.


[The figures used were Verlinden and Warriors.]


Figures:

The figures used were Verlinden and Warriors.   Again, I used numerous shades of olive drab; no two uniforms were to be the same color.   The faces, (my first) were done in oils.   The newspaper and letter were made from Kleenex soaked in a white glue and water mix.   A permanent ink marker was use to simulate the printing, photos and writing.   The surfaces were brushed with Poly Scale flat for a sealer.

[no two uniforms were to be the same color]
[The faces were done in oils.]


[The letter was made from Kleenex soaked in a white glue and water.]


Base:  The base was an 8x10 picture frame.   The glass of the frame kept the celluclay medium from warping the entire project.   While the celluclay was still wet, I added surface detail such as tank tread imprints, recoil spade pit and the brick walls.   Once dry, the groundwork, which consisted of a mix of real dirt, several shades of static grass, sand, small rocks, and diced raspberry root, was applied to the celluclay.   Final touches such as the brick rubble, gas cans, powder tubes etc. were then added.
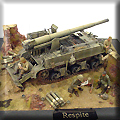


[For my first diorama, I was pleased with the results.]


For my first diorama, I was pleased with the results.   Many other details went into the diorama, but this narrative is getting way too long.   Reference materials were few and far between, however I did find the Squadron and Concord books on U.S. Self-Propelled Guns to be very helpful.


[The base was an 8x10 picture frame.]