| Based on the D chassis, this kit represents the earliest version of the Panther
recovery vehicle. Components for this build include Dragon's Premium Edition of their Panther
D with molded on Zimmerit, the long out of production Precision Models Bergepanther conversion,
Fruilmodel link to link tracks, spare bits of photo etch to supplement the kit included items, and
several scratch built/spares box details.
|
|
The running gear is very straightforward with the road wheel arms already molded
in place. A quick road wheel seam cleanup, cementing of the drive sprockets and idler wheels
together, and working out the number of track links needed to represent the often seen track sag
finishes this stage of assembly.
|
|
|
| As long as armies have deployed armored vehicles,
there has been a need to recover the unlucky ones that broke down or suffered battle damage.
Over the short time of the tank's existence, a number of ad-hoc solution were developed but during
WWII, when the vehicles grew exponentially in weight, the Germans found that their 18-ton Sd.Kfz. 9
halftrack then employed for the job was no longer up to the task. It was not uncommon to require
two or even three vehicles to recover a massive Panther, Tiger and King Tiger series tank.
Therefore in 1943, a plan was implemented to create a recovery vehicle based on one of the chassis's
it was designed to recover.
|
|
The first 12 Bergepanthers were produced by MAN using the Ausf. D hull. Conversion was fairly simple,
omitting the turret and covering the opening with a wooden cover, and also adding a simple boom crane with
a 1.5-ton capacity. Later vehicles were equipped with an onboard winch rated at 35 to 40 tons, and
a large spade added to the rear hull. The Bergepanther was very successful, with units based on D, A,
and G models, which were produced for basically the rest of the war. Apparently, it was the success
of the Bergepanther that prompted the Germans to produce recovery variants of their Panzer IIIs & IVs.
Even the British evaluated the unit post-war, with the conclusion that it was a "useful" vehicle.
The recovery vehicle concept continues to this day, and it is common if not standard practice to create
a recovery vehicle model of every military vehicle series put into service.
|
|
![[The brackets on the driver's side of the turret ring are supplied in the kit.]](JH-BP-025b.jpg)
![[The passenger side of the turret rind feature an added pair of scratch built brackets, which were used to stow the engine deck crane assembly poles, push beam, and a variety of scratch built rods and beams often seen in period photos.]](JH-BP-023b.jpg)
![[Completion of the rear deck area includes adding mounting points for the deck crane, two supports and a lock down part for the 2 towing bars, and the bars mounted tin the stowed position.]](JH-BP-006b.jpg)
![[A revised, larger towing pintle also replaces the kit-supplied item on the lower rear hull.]](JH-BP-014b.jpg)
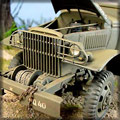
![[The forward hull includes 2 added push points, and a glacis plate step to assist in boarding the vehicle from the front.]](JH-BP-017b.jpg)
![[The driver's side, periscope mounted AA machine gun hard point supports the kit supplied MG 42.]](JH-BP-018b.jpg)
![[The side-mounted tools are secured with PE tool clips and small angle shaped chain and pins are used to hold the tow cables in place.]](JH-BP-010c.jpg)
![[More chain is used on the spare track link holders, and the side skirts are kit supplied metal items with plastic mounting brackets.]](JH-BP-012c.jpg)
![[The side mounted stowage and spare track brackets are a combination of kit supplied PE items and modified kit or scratch built items.]](JH-BP-007c.jpg)

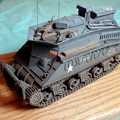
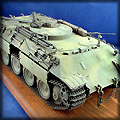
![[Dragon's Premium Edition Panther D and the Precision Models Bergepanther conversion were used to produce an early Bergepanther.]](JH-BP-019Xb1.jpg)
![[The running gear is very straightforward with the road wheel arms already molded in place.]](JH-BP-002b.jpg)
![[Areas underneath the engine deck were boxed off and painted black to block off the open space.]](JH-BP-015a.jpg)
![[Building the conversion starts with the deletion of the entire turret assembly and replacing it with a 2 piece resin casting that represents the bolted steel straps and wood decking that was used to blank out the entire turret ring area.]](JH-BP-005a.jpg)
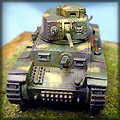
![[The kit was painted with German yellow from Humbrol, underneath a very faded, randomly applied camouflage of Humbrol German green, and a final light blending over spray of the lighter yellow to tone down and tie all the colors together.]](JH-BP-016a.jpg)
![[Dragon's Premium Edition kit is very complete, and the molded on Zimmerit was very subtle, yet quite effective.]](JH-BP-022a.jpg)
![[The Precision conversion is well molded, straightforward, and requires no major kit modifications to produce a seldom seen early variant of an otherwise commonly noted main battle tank.]](JH-BP-021a.jpg)