![[8.8 cm Flak 37 auf Zugkraftwagen 18t Sd.Kfz. 9]](CS-Famo-0139a.jpg) |
| I started to think about building a Flak Famo back in 1998 after reading
a feature article about one in a Modeling Magazine. I bought a Tamiya Famo and then hoped
that someone would one day come out with a conversion. Nothing in plastic kit format came
out that I ever saw, but I did see that Blast had a prototype on display at a model show I attended
one year. If they made it, I never saw it. I eventually found out that Tiger Models
was going to make a conversion so I started following their blog, although it still took them a
while to have it ready. I bought it as soon as it was available, as did my friend Steve.
The idea was that we would build our kits in parallel. I already had the Famo and the Dragon
Flak 37 that was also required for the full conversion. Then came the long building cycle
which took me almost 6 months to complete, with Steve's help. I don't think I could have ever
finished mine without the tips he gave me that he learned from working on his at the same time.
It was a challenge to say the least!
|
|
![[The project is a combination of Tamiya, and Dragon kits with a Tiger Models conversion.]](CS-Famo-0144a.jpg) |
|
 |
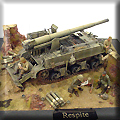
What we are referring to here as a Flak Famo was known in the parlance of the German Army as the
8.8 cm Flak 37 (Sfl.) auf Zugkraftwagen 18t (Sd.Kfz. 9). As denoted in the name, the
vehicle was based on the 18 ton Famo Sd.Kfz 9 half-track that was in design from 1936 to 1939, and
entered production in 1940. It was created to serve as a prime mover for heavy towed guns,
and also to perform tank recovery duties. Approximately 2,500 were produced between 1938 and 1945.
The Sd.Kfz. 9 had the standard ladder frame chassis and was powered by a Maybach HL 108 12-cylinder,
water-cooled, 10.8 liter (661.4 cu in), gasoline engine that produced 270 horsepower. It used
a syncromesh ZF G 65 VL 230 transmission with four forward and one reverse gears, and had two separate
fuel tanks, with a combined 85 gallon total capacity.
The origins of the Flak Famo likely came about in 1939 when ten 12-ton half-tracks were augmented with
a 88mm FlaK 18 gun for anti-tank use. In 1940, 15 Famo Sd.Kfz 9s were armed with the Flak 18 to
be used as anti-aircraft vehicles, and during 1942, an order was placed by the Luftwaffe to build 112
more units using the improved 88mm Flak 37. The first 14 vehicles were delivered in June and
July of 1943, but the order was cancelled and further production did not continue.
The crew and engine compartments of these vehicles were lightly armored, which limited the gun's ability
to fire directly ahead. The gun itself also had a limited traverse because of the armored cab, and
could only be fully traversed with the gun elevated. A platform with drop-down sides was fitted to
give room for the gun, and outriggers were necessary to brace the platform sides to support the weight of
the gun crew. The Sd.Kfz. 9 based vehicle in the flak gun configuration weighed 25 tons.
|
|


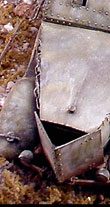
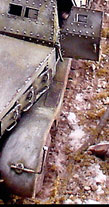
![[The Tiger Models conversion was well engineered except there were issues with the doors fitting into the armored cab.]](CS-Famo-0152a_01.jpg)
![[The Tiger Models conversion was well engineered except there were issues with the doors fitting into the armored cab.]](CS-Famo-0152a_02.jpg)
![[The Tiger Models conversion was well engineered except there were issues with the doors fitting into the armored cab.]](CS-Famo-0152a_03.jpg)
![[The Tiger Models conversion was well engineered except there were issues with the doors fitting into the armored cab.]](CS-Famo-0152a_04.jpg)
![[The Tiger Models conversion was well engineered except there were issues with the doors fitting into the armored cab.]](CS-Famo-0152a_05.jpg)
![The Tiger Models conversion was well engineered except there were issues with the doors fitting into the armored cab.]](CS-Famo-0152a_06.jpg)
![The Tiger Models conversion was well engineered except there were issues with the doors fitting into the armored cab.]](CS-Famo-0152a_07.jpg)
![The Tiger Models conversion was well engineered except there were issues with the doors fitting into the armored cab.]](CS-Famo-0152a_08.jpg)
![The Tiger Models conversion was well engineered except there were issues with the doors fitting into the armored cab.]](CS-Famo-0152a_09.jpg)
![The Tiger Models conversion was well engineered except there were issues with the doors fitting into the armored cab.]](CS-Famo-0152a_10.jpg)
![[The Tamiya Famo was a typical Tamiya kit and went together without a problem, and the Dragon Flak 88 was also a pleasure to build.]](CS-Famo-0130_01.jpg)
![[The Tamiya Famo was a typical Tamiya kit and went together without a problem, and the Dragon Flak 88 was also a pleasure to build.]](CS-Famo-0130_02.jpg)
![[The Tamiya Famo was a typical Tamiya kit and went together without a problem, and the Dragon Flak 88 was also a pleasure to build.]](CS-Famo-0130_03.jpg)
![[The Tamiya Famo was a typical Tamiya kit and went together without a problem, and the Dragon Flak 88 was also a pleasure to build.]](CS-Famo-0130_04.jpg)
![[The Tamiya Famo was a typical Tamiya kit and went together without a problem, and the Dragon Flak 88 was also a pleasure to build.]](CS-Famo-0130_05.jpg)
![[The Tamiya Famo was a typical Tamiya kit and went together without a problem, and the Dragon Flak 88 was also a pleasure to build.]](CS-Famo-0130_06.jpg)
![[The Tamiya Famo was a typical Tamiya kit and went together without a problem, and the Dragon Flak 88 was also a pleasure to build.]](CS-Famo-0130_07.jpg)
![[The Tamiya Famo was a typical Tamiya kit and went together without a problem, and the Dragon Flak 88 was also a pleasure to build.]](CS-Famo-0130_08.jpg)
![[The Tamiya Famo was a typical Tamiya kit and went together without a problem, and the Dragon Flak 88 was also a pleasure to build.]](CS-Famo-0130_09.jpg)
![[The Tamiya Famo was a typical Tamiya kit and went together without a problem, and the Dragon Flak 88 was also a pleasure to build.]](CS-Famo-0130_10.jpg)
![[The TMD instructions were very well done and pretty easy to follow. They tell you when to refer to the Tamiya and Dragon instructions for building their respective parts of the vehicle.]](CS-Famo-0156_01.jpg)
![[The TMD instructions were very well done and pretty easy to follow. They tell you when to refer to the Tamiya and Dragon instructions for building their respective parts of the vehicle.]](CS-Famo-0156_02.jpg)
![[The TMD instructions were very well done and pretty easy to follow. They tell you when to refer to the Tamiya and Dragon instructions for building their respective parts of the vehicle.]](CS-Famo-0156_03.jpg)
![[The TMD instructions were very well done and pretty easy to follow. They tell you when to refer to the Tamiya and Dragon instructions for building their respective parts of the vehicle.]](CS-Famo-0156_04.jpg)
![[The TMD instructions were very well done and pretty easy to follow. They tell you when to refer to the Tamiya and Dragon instructions for building their respective parts of the vehicle.]](CS-Famo-0156_05.jpg)
![[The TMD instructions were very well done and pretty easy to follow. They tell you when to refer to the Tamiya and Dragon instructions for building their respective parts of the vehicle.]](CS-Famo-0156_06.jpg)
![[The TMD instructions were very well done and pretty easy to follow. They tell you when to refer to the Tamiya and Dragon instructions for building their respective parts of the vehicle.]](CS-Famo-0156_07.jpg)
![[The TMD instructions were very well done and pretty easy to follow. They tell you when to refer to the Tamiya and Dragon instructions for building their respective parts of the vehicle.]](CS-Famo-0156_08.jpg)
![[The TMD instructions were very well done and pretty easy to follow. They tell you when to refer to the Tamiya and Dragon instructions for building their respective parts of the vehicle.]](CS-Famo-0156_09.jpg)
![[The TMD instructions were very well done and pretty easy to follow. They tell you when to refer to the Tamiya and Dragon instructions for building their respective parts of the vehicle.]](CS-Famo-0156_10.jpg)
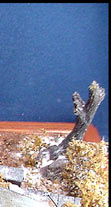
![[I dry-brush paint everything over a black primer base - nothing was done using an airbrush.]](CS-Famo-0146b.jpg)
![[I painted the vehicle and the figures using Vallejo paint.]](CS-Famo-0158b.jpg)

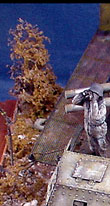

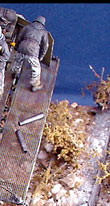
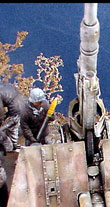
![[Dragon's Flak 88 crew provided the figures that come in a set with additional arms for making the anti-aircraft figure positions.]](CS-Famo-0145b.jpg)
![[Some of the figures were slightly modified, but most are right out of the box.]](CS-Famo-0148b.jpg)