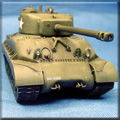
| This is the old but totally respectable ESCI Churchill III kit from the Eighties.
Even with the advent of the new Dragon kit of the same version, I think the ESCI kit still stands up
pretty well. Oddly, I always thought that the box art incorrectly labeled this kit as a Mk. IV
Churchill, when on examination, it is clearly a Mk. III. I have since realized that what they were
referring to was that the Churchill was actually the Infantry (type) Tank Mk IV, (verses the Cruiser
type tank). The Matilda was the Infantry Tank Mk. II and the Valentine was the Mk. III. Therefore the
literal name of this particular tank would be Infantry Tank Mk. IV, Churchill Mk. III. Got it?
|
|
| The weak points would be the molded on tools and tow cables, solid hatch handles,
and simplified grates on the air intakes, but the rivet detail on those big old sponsons sure looks nice
after a burnt umber wash. The molding and parts fit are both good and over all, everything looks pretty decent.
|
|
|
 |
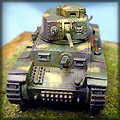
The Churchill was one of the most important British tank designs of WWII. Based on lessons learned in
WWI, the tank was an antiquated design by the time it went into production in 1940. With its elongated
hull designed to cross trenches, and its slow lumbering speed keeping it close to the infantry it was
meant to support, the design was truly a bridge between the origins of tank warfare to the more modern
concepts we've become accustomed to today. The tank's career was almost over before it began, as it
became apparent that the style of war that it had been designed to fight had changed forever. Its lack
of speed however did not hamper its effectiveness as much as its meager armament, which proved to be the
Churchill's biggest issue while in service. The problem was that the turret was not big enough to easily
accept a new gun. This led to a series of compromise solutions meant to extend the service life of this
important British tank design.
The Churchill Mk. III entered service in March 1942, and introduced a new welded turret with more powerful
6pdr gun. It had a crew of five, and was powered by a Vauxhall-Bedford "Twin-Six" 12-cylinder gasoline engine
that produced 350hp. The Churchill had a top speed of 15mph, 8mph cross-country, and could cross a 10ft trench.
Even though it was an antiquated design, with its heavy armor and roomy interior, it was a popular choice for
conversion into engineering, bridge-laying, and recovery variants, and over 5600 total units were produced.
|
 |
|

![[The way the kit goes together with all those little road wheels sandwiched in the sponsons is clever. ]](Chill-005b1.jpg)
![[I feared it might be tedious, but it was a snap.]](Chill-010b1.jpg)
![[The basic kit hull.]](Chill-004c.jpg)
![[The turret starting point. ]](Chill-014Xc.jpg)
![[I ended up drilling the air intake grates by hand using a micro drill.]](Chill-029Xc.jpg)
![[The molded fender loops would be replaced.]](Chill-027Xc.jpg)
![[I used a piece of styrene to form the brass loops.]](Chill-035Xc.jpg)
![[All of the Eduard brass parts on the hull front.]](Chill-040Xc.jpg)
![[The Eduard brass engine deck details.]](Chill-047Xc.jpg)
![[The Eduard brass fender storage racks.]](Chill-032Xc.jpg)
![[The finished brass fender storage racks.]](Chill-053Xc.jpg)
![[The Eduard set also provided the cable catches above the sponson side doors.]](Chill-061Xb.jpg)
![[The kit came with styrene link-n-length track.]](Chill-017Xb.jpg)
![[A primer coat of Model Master Burnt Umber enamel was applied.]](Chill-062Xb.jpg)
![[Tamiya Khaki Drab was the color of choice. ]](Chill-071Xb1.jpg)
![[Tamiya acrylic clear coat was applied for decals and an oil wash.]](Chill-077Xb.jpg)
![[Ready for decals.]](Chill-083b.jpg)
![[The decals stayed together, and went on without any problems.]](Chill-084Xb.jpg)
![[The markings depict a 51st Royal Tank Rgt. Tunisia, 1943 tank.]](Chill-094Xb.jpg)
![[The base is a cast resin product from Washington state based Masterpiece Models.]](Chill-107b.jpg)
![[The base was primed with Burnt Umber, and then feather layered with increasingly lighter shades of browns, tans and buffs with an airbrush .]](Chill-119b.jpg)
![[The Churchill was one of the most important British tank designs of WWII.]](Chill-137a.jpg)
![[Everything built up pretty routinely, with the only issue experienced coming when installing the rear drive sprockets.]](Chill-121b.jpg)
![[I like building the older kits, especially if they are like this one.]](Chill-113b.jpg)
![[The business end.]](Chill-129b.jpg)
![[Dry-brushing with the base color mixed with oils brought out the highlights.]](Chill-147b.jpg)
![[The Eduard parts dress things up a bit.]](Chill-144b.jpg)
![[The molded on tools still worked out well enough.]](Chill-142b.jpg)
![[The finished turret, note the signal flags in the attached cylinder.]](Chill-118b.jpg)
![[This was a nice little project. Fairly simple and not very complicated.]](Chill-123a.jpg)
![[This is the old but totally respectable ESCI Churchill III kit from the Eighties.]](Chill-125Xb.jpg)
![[Even though the kit is 30+ years old, it still stands up pretty well.]](Chill-138b.jpg)