| This is the second ICM kit that I have built. The other was an airplane, but
both kits were very well engineered. The parts molding and detail are crisp, and the fit is
fine. From my experience, the ICM kits are miles ahead of the typical Russian kit. The
instructions are clear and easy to follow, and the decal sheet is good quality with options for several
vehicles. There is even a very nice etched fret, which included the turret grenade screen, and
the hull top grate. The biggest, and maybe only shortcoming of the kit is the total lack of any interior.
|
|
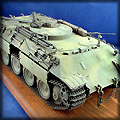
![[The Goffy resin update replaces the entire upper & lower hull, and has a full interior.]](Sd222-193b.jpg) |
| When I started building the kit, the lack of interior really didn't bother me, as I figured it
wouldn't be visible anyway. Luckily however, not long into the build, I stumbled upon the Goffy update
set for the 222 at the Kalamazoo show. This is a resin update with a very full interior, including parts
to detail the gun and turret interior. Some exterior stowage is also provided, including a nice tarp.
As the interior is cast into the hull upper and lower halves, a good portion of the original kit is replaced, but
the kit parts meshed pretty well with the update set. The kit provides a nice under chassis, and it is
clever the way it goes together, which is a plus, because that made installing the kit chassis parts to the update
hull a snap. The only fit issue I had was the kit hull top mating to the upper half of the resin hull, but that was minor.
|
|
|
 |
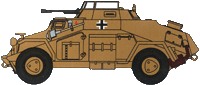
The Sd.Kfz. 222 entered production in 1936, and was a modification of the Sd.Kfz. 221 armored car,
which was developed in 1934. The main difference was the enlarged turret designed to carry
the 20mm automatic gun. Early models used a 3.5-liter engine, but in 1942 an improved chassis
was introduced that featured hydraulic brakes and a 3.8-liter engine. The Sd.Kfz. 222 had a
crew of three and weighed 4.8 tons. Top speed was 85 km/hr, and the vehicle could travel 300 km
on a tank of fuel. Armament consisted of a 20mm KwK 30 or KwK 38 gun, and a 7.92mm MG 34, and it
normally carried 180 20mm rounds and over 1000 rounds of 7.92mm.
These armored cars were issued to reconnaissance battalions, and were used to probe enemy defenses, and
use their short-range radios to pass information to other vehicles with longer-range radios, which would
convey the information to HQ. Around 1000 units were produced before production ended in 1943.
The plan was to replace the units with the eight-wheeled armored cars, but the horribly muddy Russian roads
led to the development of the Sd.Kfz. 250/9 halftracks, which ended up in the recon role. In spite of
all that, the Sd.Kfz. 222 was still used on all fronts through the end of the war.
|
 |
|
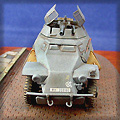
![[The biggest, and maybe only shortcoming of the kit is the total lack of any interior.]](Sd222-0001c.jpg)
![[The Goffy resin update hull. ]](Sd222-011c1.jpg)
![[The kit suspension & drive train on the Goffy resin hull.]](Sd222-023c1.jpg)
![[The Goffy resin upper hull with kit hull top.]](Sd222-027c.jpg)
![[The ICM kit includes a very nice etched fret, which included the hull top grate.]](Sd222-031c.jpg)
![[The Goffy resin update hull painted.]](Sd222-078c.jpg)
![[The painted Goffy resin upper hull .]](Sd222-066c.jpg)
![[The full interior had to be painted and finished before the hull top and bottom pieces were cemented together.]](Sd222-076c.jpg)
![[The interior washed and flat coated and ready for assembly.]](Sd222-070c.jpg)
![[The resin hull halves mated up together pretty well.]](Sd222-081c.jpg)
![[I used the spare from the update set because the cover had a nicer texture than the kit part. ]](Sd222-104c.jpg)
![[The kit fenders and storage lockers fit well to the resin hull.]](Sd222-099c.jpg)
![[The update set adds the entire lower portion of the turret, including seats and center pylon.]](Sd222-025b.jpg)
![[The grenade screen for the turret came in the kit as one piece - I cut it in half to pose it in the open position.]](Sd222-194b.jpg)
![[Tamiya acrylic clear coat was applied for decals and an oil wash.]](Sd222-119b.jpg)
![[It was then sealed with a Model Master Acryl flat coat and dry brushed out.]](Sd222-123b.jpg)
![[I got the resin street section from a small vendor in London, Ontario called Astra Scale Models.]](Sd222-132b.jpg)
![[The Astra resin base after painting.]](Sd222-174b.jpg)
![[A light pigments was was applied to the under chassis, then a clean brush was used to remove the excess amounts of pigment..]](Sd222-196a.jpg)
![[Most of the decals came from the kit, but the thin white German crosses came from another kit..]](Sd222-189b.jpg)
![[The large tarp was from the update set. The small tarp is Verlinden, and the helmets came from a Preiser figure set..]](Sd222-210b.jpg)
![[The fronts were turned slightly to the right.]](Sd222-207b.jpg)
![[Overall this was a pleasant build, with no major problems or issues.]](Sd222-208b.jpg)
![[Both ICM and Goffy have produced quality products that work well together and can be used to yield a very nice finished product.]](Sd222-191a.jpg)

![[The ICM Sd.Kfz. 222 Kit in 1/72 scale.]](Sd222-200xb1.jpg)