This is the Trumpeter kit produced in 2005. It is a pretty decent kit,
but it definitely won't be confused for a Tamiya kit. The parts molding is pretty good,
and the fit isn't bad either, but there were some problem parts. One of the hatches on the
hull top did not fit well, and the commander's machine gun assembly was also problematic. I
had some trouble getting the side skirt armor to fit correctly, and the drive sprockets also seemed
to be a little too wide when I tried to cover them with the final pieces of skirt armor. I
ended up sanding the inside of the sprocket covers to thin them up to fit. The instructions
were also not up to Tamiya standards, as I discovered that when there were left and right parts,
the instructions typically reversed the part numbers. Sometimes it didn't matter, but
sometimes it did.
|
|
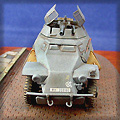
![[The kit is all styrene with no etch or anything else fancy, and the tracks are the rubber band type. ]](Strv-142b.jpg) |
The kit is all styrene with no etch or anything else fancy, and the tracks are the rubber
band type. They are nicely detailed, and look pretty good, but I found that they were two
links too long on each side. I have heard that this kit is a scaled down version of their
1/35 scale kit. I can't confirm this but I would believe it, because there sure were a lot
of very small parts. It wasn't a big issue, but be careful with the suspension arms, as they
were so thin that they were barely up to the task of supporting those big road wheels.
The arms were also keyed where they fit into the hull, however the key lug was so fine that they
didn't hold up well after assembly.
|
|
|
 |
The Swedish Stridsvagn Strv-103 commonly known as the S-tank
was designed in the 1950s, with a development contract awarded to the Bofors Company in 1958.
The first prototypes were completed in 1961, followed by 300 vehicles produced between 1966 and 1971.
The crew of the S-tank are all located in a central fighting compartment. The driver/gunner
sits on the left facing forward, and behind him is the radio operator, who faces the rear, and also
happens to drive the tank in reverse when required. The commander sits to the right, in the
small rotating copula, and also has limited driving capabilities.
The main gun is the L74 105mm rifled gun, which is a lengthened version of the British L7 gun and is
produced in Sweden. The tank is equipped with an auto loader, and stores a 50 round mix of APDS,
HESH, HE and smoke shells, depending on the mission. It can fire 10-15 rounds per minute and empty
shell cases are automatically ejected through a hatch in the rear of the hull.
The C model is powered by the 290hp Detroit Diesel 6V-53T 6-cylinder engine, which replaced the Rolls
Royce engine of the earlier models. It has a road speed of 31mph, with a range of 242 miles.
It also has a Boeing gas turbine, which is used to provide extra power for combat or difficult
terrain.
As the tank has no turret, it has an unusual method of elevating the gun. It uses the vehicle's
hydropneumatic suspension to raise or lower the entire front of the tank between +12 to -10 degrees.
When the gun is fired, the suspension is locked to provide a stable platform.
This unconventional design tested radical ideas that seemed promising at first, however it had several
negative aspects that became apparent over time. Most importantly, it could not fire with any
accuracy on the move, and also it exposed a large cross-sectional area when in a hull down firing
position. These are some of the reasons that the British declined to adopt the tank after a
long trial period. The S-tank was never further developed, and was replaced by the German
Leopard tank when it reached the end of its service life.
|
|

![[I cut out a hatch on one of the rear storage boxes and filled it with some Presser bags, rolls, and other equipment items.]](Strv-039c.jpg)
![[I sliced off the plastic lump hatch handles on these hatches, and replace them with fine wire. ]](Strv-024c.jpg)
![[I sliced off most of the plastic lump handles on the hull, and replace them with fine wire.]](Strv-026c.jpg)
![[The start of the commander's copula.]](Strv-012c.jpg)
![[There has to be around 20 parts on the little commander's copula.]](Strv-018c.jpg)
![[I replaced the connecting rod on the commander's machine gun assembly with some wire, not only because it looked better, but also because I just couldn't figure out how the kit part was supposed to work!]](Strv-064c.jpg)
![[The hull top before anything is attached.]](Strv-010c.jpg)
![[Assembly of the hull is almost finished.]](Strv-056c.jpg)
![[The hull top with all of the holes filled.]](Strv-032c.jpg)
![[To get the splinter camouflage scheme, I cut blue masking tape on a mirror, and then placed all of the pieces on the tank.]](Strv-068b.jpg)
![[The kit right after all the colors were sprayed and the tape removed. The resin base has also been primed with Model Master Burnt Umber at this point.]](Strv-074b.jpg)
![[After the decals were applied, the entire vehicle got a wash of thinned Burnt Umber artist's oils. ]](Strv-088b.jpg)
![[Before the decals, the kit was coated with Tamiya clear acrylic. The Trumpeter decals were not a problem. Note the MV lenses. ]](Strv-153a.jpg)
![[Dry brushing brings out the details.]](Strv-155c.jpg)
![[I purposely painted one of the shovels and one of the axes a different color, to break it up a bit.]](Strv-148c.jpg)
![[A view of the hatch on one of the rear storage boxes that I cut open and filled with some bags, rolls, and other equipment. Note the MV lenses.]](Strv-149c.jpg)
![[The base was a cast resin piece from Masterpiece Models out of Vancouver, WA that I found at AMPS a couple years ago.]](Strv-122b.jpg)
![[After a coat of Model Master Burnt Umber, it was covered with railroad groundwork, and then the trees were inserted.]](Strv-119b.jpg)
![[It may not be as nice as a Tamiya kit, but at around a $10 list price, its also a lot more reasonable, so I guess you get a pretty good bang for your buck! ]](Strv-145b.jpg)
![[Overall the Trumpeter kit was a nice project. The castings were good, and the fit was decent, but the instructions could have been better.]](Strv-159a.jpg)
![[This is the Trumpeter kit produced in 2005.]](Strv-129b.jpg)
![[The suspension arms were so thin that they were barely up to the task of supporting those big road wheels.]](Strv-008b.jpg)