A number of detail changes were made to the kit:
1. The kit comes with a nicely detailed radiator but it is hidden behind a solid molded
grill. I replaced the grill with etched brass screen and boxed in the area in front of the
radiator. I cut the Chevy logo from a picture I had of a real 15-cwt to replace the one lost
on the original part.
2. The front windows were opened by cutting the clear part in two and adding framing with
styrene strips. The outer frame work was expanded to accept the now separate window frames,
and the widows were glued in the open position. Scratch built window supports were then added.
3. The cab was detailed by replacing the instrument panel with photocopies of instruments
behind a ˝ round piece of clear rod to represent the look of the real panel. I also added
addition levers, fuel switches, and vents.
4. I felt that the side windows were overly thick so I cut them off to be stored in the truck
bed. This was not an unusual situation in actual use.
5. To finish off the cab, I replaced the rifles holders with ones made from brass shim
stock. To these I mounted Lee Enfield rifles (with scratch built straps) from a Dragon figures
and weapons set.
6. The last modification was to replace the molded-on tie downs on the truck bed with ones
made of wire.
7. The kit's representation of the tarp covering the bed is totally unconvincing so I decided
to replace it with one of my own construction. This is where I spent most of my time on this
project. From the CMP intranet web site I found a sequence of pictures that showed all sides
of the tarp arrangement. I built a jig out of sheet styrene to represent the support frame
work. I then tried various methods and materials to attempt to produce a realistic looking bed
cover. Because of the complex nature of the tarp, I ended up drawing a pattern of all of the
separate pieces, (28 in all including tied down loops) laying them out as if I was going to sew them
together. I reproduced the parts in various materials, but the only one I was happy with was a
tissue wrapping paper. Gluing the parts together with thinned white glue, I constructed the tarp
on the jig. When dry, I sprayed the outside of the trap with thinned white glue to set the basic
shape. Then I sprayed both inside and out with paint to fix the basic color. Next I added
the tied down ropes, rolled up the side sheets and folded back the rear opening. When all was dry
I transferred the tarp to the model. To secure the ropes to the tie downs and the side of the box,
I covered them with a wax paste (used to secure doll house miniatures to tables and such). It's
transparent and has just enough stickiness to hold the ropes in place.
8. To finish off the model, I added miscellaneous boxes, equipment, and tools from various sources
to the bed. I then mounted the model on a landscaped base.
|
|
![[Index]](../../../Can-leaf-1.jpg)
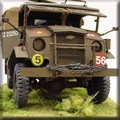
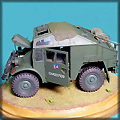
![[The model subject is a Chevrolet 15-cwt CMP truck.]](SF-C15-02a.jpg)
![[The 15-cwt CMP truck is roughly the equivalent of the ľ ton truck.]](SF-C15-12a.jpg)
![[It has a type 13 cab, and a wooden general service truck bed.]](SF-C15-13a.jpg)
![[It's painted and marked to represent a support vehicle used by the Hastings and Prince Edward Counties Regiment near Ortona, Italy in December 1943. ]](SF-C15-05a.jpg)
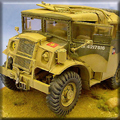
![[This kit was originally issued by Peerless Max.]](SF-C15-08a.jpg)
![[I replaced the grill with etched brass screen and boxed in the area in front of the radiator.]](SF-C15-03a.jpg)
![[The kit's representation of the tarp covering the bed is totally unconvincing so I decided to replace it with one of my own construction.]](SF-C15-16a.jpg)
![[The kit was painted a mix of Humbrol 29 Dark Earth, and 170 Brown Bess in the ratio of 6:4.]](SF-C15-06a.jpg)
![[This particular model is the Testors / Italeri issue.]](SF-C15-15a.jpg)
![[This is a nice kit.]](SF-C15-11a.jpg)