|
The build was relatively straightforward with only two modifications made to the base kit.
The Eduard detail set (35458) was also used to refine the detail. General construction
progressed normally. There were a number of ejector pin marks to fill on the inside of
the chassis frame, on the underside of the cab floor, and on the cab roof. The interior
was built, painted and weathered first. The truck body and the chassis were then built,
painted, and weathered before being combined to complete the basic structure.
|
|
![[Index]](../../../Can-leaf-1.jpg)

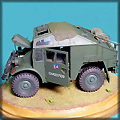
![[A WWII Chevrolet Field Artillery Tractor as it appeared in Italy during 1944.]](SF-Chevy-01d.jpg)
![[These vehicles were built by Chevrolet in Oshawa, Ontario.]](SF-Chevy-02d.jpg)
![[The Canadians received replacement vehicles from the British when 3 of their transport ships were sunk.]](SF-Chevy-07d.jpg)
![[The kit is the Italeri (kit # 240) issue of the Chevrolet Gun Tractor originally produced by Peerless Max.]](SF-Chevy-05d.jpg)
![[The Eduard detail set (35458) was also used to refine the detail.]](SF-Chevy-15d.jpg)
![[The replacement Eduard grill enhances the front of the truck.]](SF-Chevy-03d.jpg)
![[There are 15 two-part latches that needed to be installed.]](SF-Chevy-08d.jpg)
![[The kit roof tarp was out of scale so it was replaced by one made from tissue and white glue.]](SF-Chevy-10a.jpg)
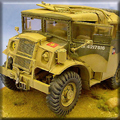
![[The color scheme reflects the vehicle's origins in the North African desert.]](SF-Chevy-11d.jpg)
![[The body colors were mixed using formulas published on the MAFVA website. A paper mask was used for painting the dark green counter shading.]](SF-Chevy-12d.jpg)
![[The model was dry brushed with the base colors mixed with Windsor & Newton oils.]](SF-Chevy-16d.jpg)
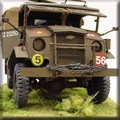
![[The division and tactical markings were custom made from solid color decal sheets and dry transfer numbers.]](SF-Chevy-04d.jpg)
![[All in all, it was a fun build, and I learned a lot.]](SF-Chevy-13a.jpg)
![[The wheel lugs were hit with a steel color for that used look.]](SF-Chevy-09d.jpg)
![[Oerhead shot]](SF-Chevy-17d.jpg)