Construction:
The build was accomplished in 4 phases.
I started by assembling the chassis, drive train, fuel tanks and winch. To this I added torsion
bar shock absorbers, along with brake and fuel lines. This subassembly was then painted and
weathered. The engine was then assembled, painted, and detailed with the addition of a distributor,
ignition cables, fuel, and other assorted lines. This phase was completed by adding the engine to
the chassis, and adding cable to the winch. |
|
![[I started by assembling the chassis, drive train, fuel tanks and winch.]](SF-FGT-IN001b.jpg)
![[To this I added torsion bar shock absorbers, along with brake and fuel lines.]](SF-FGT-IN006b.jpg)
|

![[Index]](../../../Can-leaf-1.jpg)

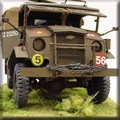
![[The subject of this article is a WWII Ford Field Artillery Tractor]](SF-FGT-08a.jpg)
![[These vehicles were built by Ford in Windsor, Ontario.]](SF-FGT-16a.jpg)
![[This kit includes a nice flat head Ford engine.]](SF-FGT-IN009c.jpg)
![[The overall level of engine detail is minimal (compared to the Italeri kit).]](SF-FGT-IN004c.jpg)
![[From the Eduard set are the textured floor, gun racks, instrument panel, and front window details.]](SF-FGT-IN014c.jpg)
![[I added white glue soaked tissue to the seats.]](SF-FGT-IN013c.jpg)
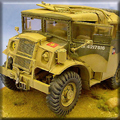
![[The kit radiator screens were cut away and replaced with etched brass pieces.]](SF-FGT-IN011b.jpg)
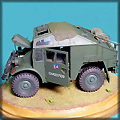
![[the kit front bumper assembly was replaced by Eduard parts, with scratch built tow clevis, and winch fair leads.]](SF-FGT-11b.jpg)