|
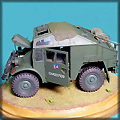
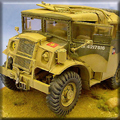
The back end of the body required the most additional detail. British field artillery,
(18 and 25 pounder guns) where mounted on a firing platform when in operation. Up to this point
in the war the gun tractors had a carrier assembly mounted on their back deck of the vehicle to store the
firing platform during transport. This rig along with the various clamps and retaining clips and
levers where scratch built and added to the rear deck. As happens in any army, the gun crews found
easier ways to transport this heavy object. First they built rigs for the platform on top of the
ammunition limber, and finally on mounts below the gun itself, that could be lowered and raised as
needed. The tractor-mounted rig was then used to secure other equipment. Final details added
to the back end included the thirteen 2 piece compartment latches, POL can carriers, and wheel well details
from the Eduard set, as well as scratch built push plates.
|
|
![[Index]](../../../Can-leaf-1.jpg)

![[The kit windows were replaced with items cut from clear sheet.]](SF-FGT-22c.jpg)
![[The kit roof tarp was out of scale so it was replaced by one made from tissue and white glue.]](SF-FGT-21c.jpg)
![[Upper hatch detail]](SF-FGT-23c.jpg)
![[The kit mirrors were replaced by scratch built items, using brass rod and Evergreen stock.]](SF-FGT-26c.jpg)
![[The back end of the body required the most additional detail.]](SF-FGT-17a.jpg)
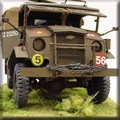
![[The barbed wire roll on the front bumper is from an Eduard's Barbed wire set.]](SF-FGT-12a.jpg)
![[A camouflage net and support rods where mounted on the platform carrier.]](SF-FGT-20c.jpg)
![[The final detail, a hook added to the winch cable.]](SF-FGT-18c.jpg)
![[The model was painted using Humbrol enamels.]](SF-FGT-28a.jpg)
![[The markings came from Quartermaster Depot decals.]](SF-FGT-10a.jpg)
![[Firestone detail]](SF-FGT-19c.jpg)
![[Overhead shot]](SF-FGT-30a.jpg)